Instagram as a social media platform is an ever-evolving space. There are new marketing tools and more creative features being released on the regular—so much so, that it’s definitely possible to have missed out on some of them (especially if you’re not a hyper-connected Gen Z-er, a Silicon Valley techie, or an Instagram employee).
But staying abreast of social media developments is part of being a successful marketer. What not a lot of people realize is that when you’re missing out on important tricks, tips, and tools, you’re not maximizing Instagram as a platform for marketing your business. This means you’re most likely missing out on your share of the 200 million users who visit at least one business page a day, or the opportunity to reach some of the 62% of people who become interested in a product after seeing it in Stories. That’s not just a waste of potential views, followers, and engagement for your brand, it’s a definite loss in what could have been revenue for your brand.
That’s why we rounded up our top 21 hacks for you to read through: so you can stay up to date with Instagram and improve your marketing game while you’re at it.
Make your Instagram Bio appear in more search results
Although search engines are blocked from indexing your Instagram photos, your profile isn’t. This means that when people do a web search of things or subjects related to your account, your profile is most likely going to pop up as one of the results.
But how do you turn that “most likely” into a “definitely”? The best and simplest way to optimize your profile for search is to create a username and bio that has all the important keywords related to your brand.
Promoting your business as a makeup artist? Write your username and bio to reflect that. This increases your chances of people finding your Instagram account every time they do a web search for makeup.
Use special fonts for your bio and captions
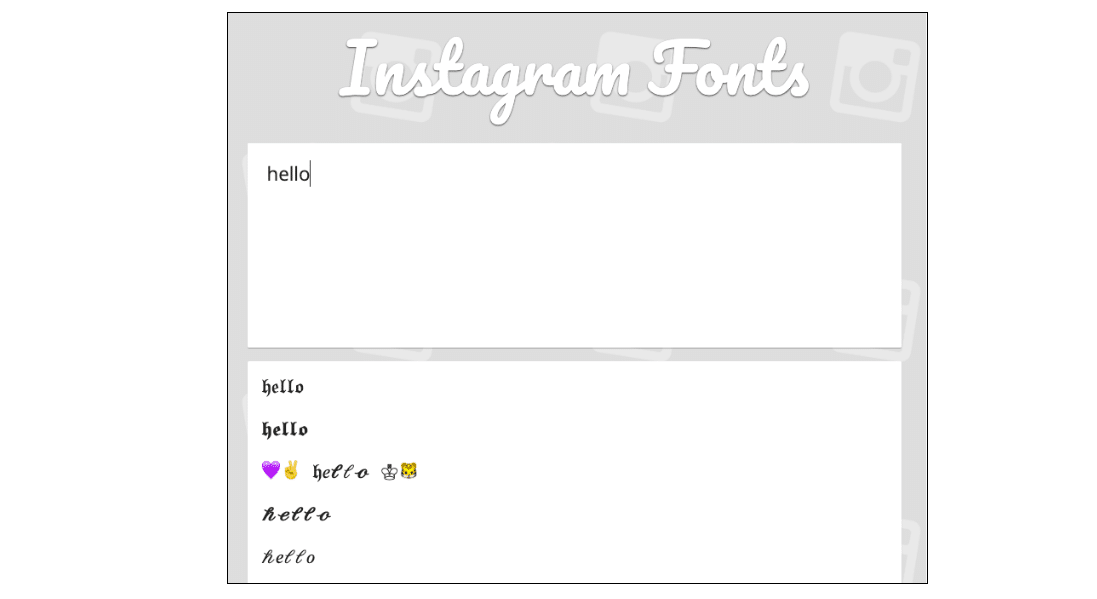
Do you find the default fonts of Instagram limiting? Or boring, maybe? Good news: aside from being able to play around with emojis, you can have fun with fonts as well.
Even better news is that it’s as easy as typing, copying, and pasting. All you have to do is to type out your text on one of the many font generators online, choose from the many styles available (or create your own), select and copy the embellished text, then paste them wherever you want them to appear.
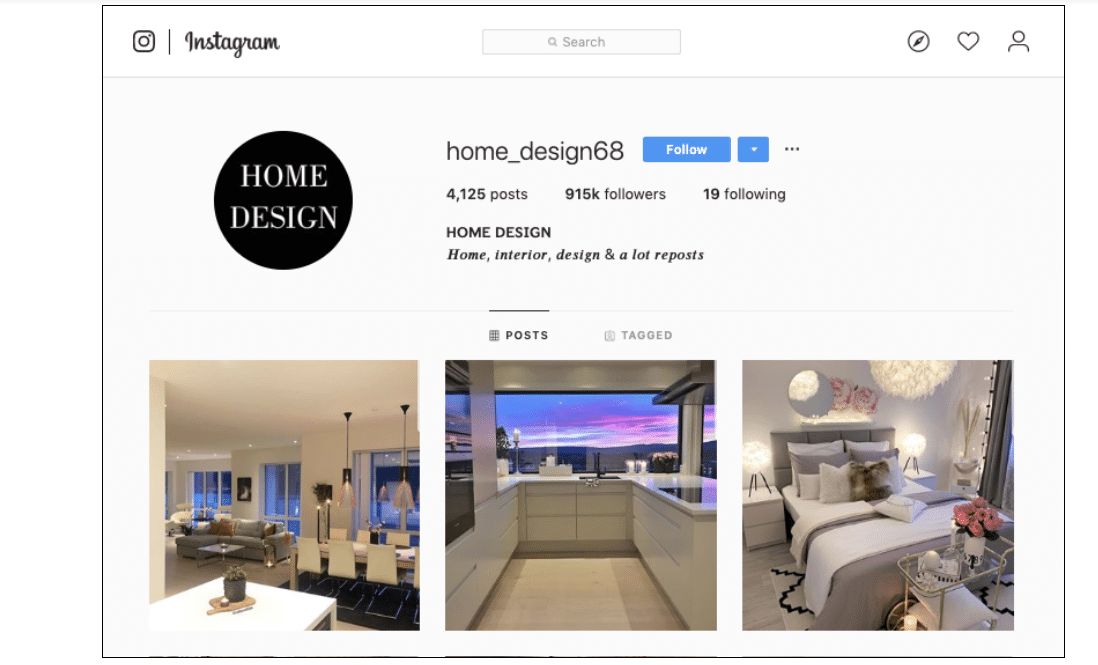
Want to jazz up your bio? Tap on the edit profile button and paste your embellished copy in the bio text box. You can even add special characters to your captions by playing around with your text on a font generator, and then copy pasting it in your captions right before posting your image.
https://www.instagram.com/home_design68/?hl=en
One word of advice though: don’t sacrifice readability for creativity. Using a special font only really works if it’s on-brand with your aesthetic, if it helps you catch people’s attention, and if your audience can actually read what’s written.
Appear in more people’s Explore Pages
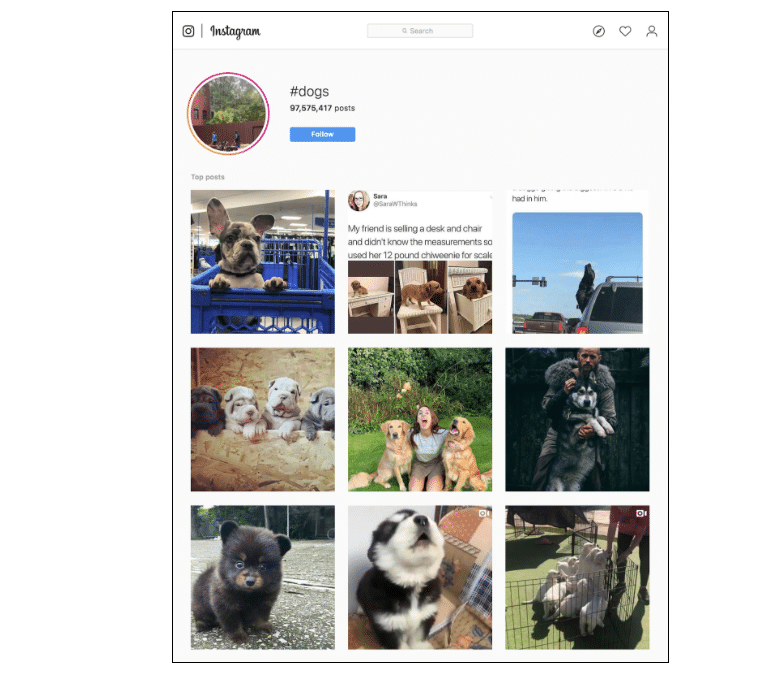
A person’s Explore Page is unique to how they interact with the app. Do they like checking out images of dogs? If that’s a yes, then their Explore Page is most likely going to be an endless scrolling through dog posts.
If you want to reach new audiences who might potentially be interested in your brand but don’t know about you yet, getting your content on their Explore Page is the way to go.
https://www.instagram.com/explore/tags/dogs/
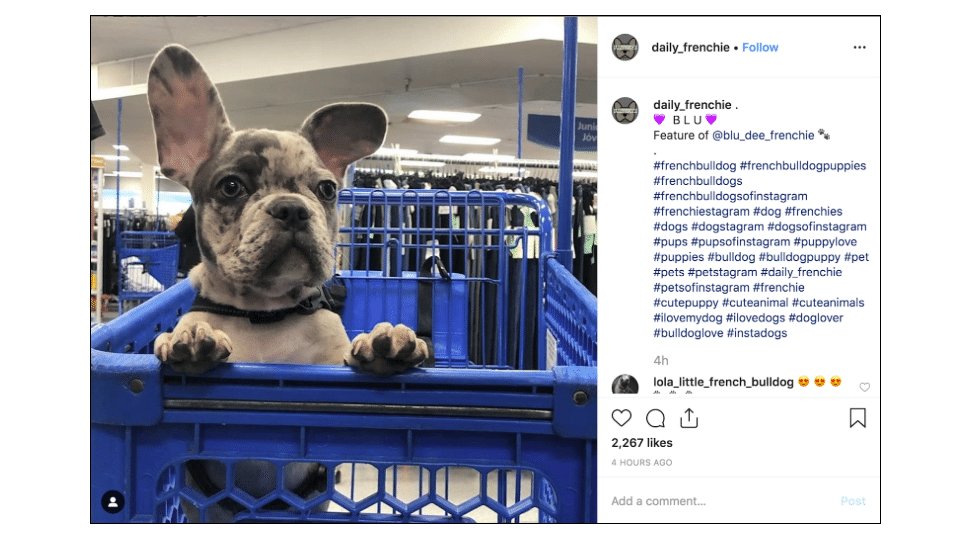
There are many ways to achieve this, but the simplest trick is to use the right hashtags. Do you have a dog grooming business you’d like to promote? Use the #dogs hashtag in the caption of your image or in a comment on your post. This will help your content appear on other dog lovers’ Explore Pages, and thus, help you reach more people who could become new followers or customers.
https://www.instagram.com/p/B4HYZhCnXL0/
Remember to be smart about how you use hashtags, though. If you use a popular hashtag that has nothing to do with your post, it will just go ignored.
Manage your Instagram Filters
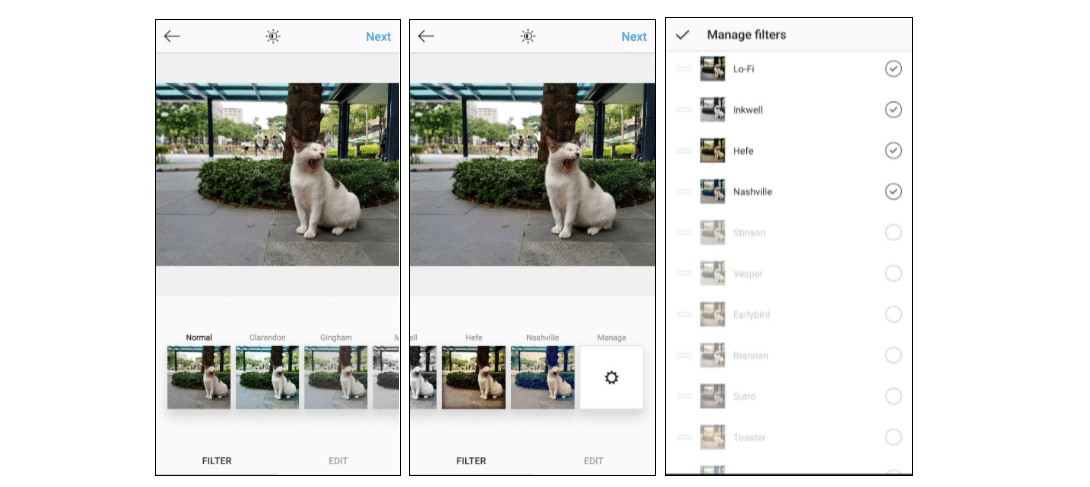
Did you know that the Filters you see when you edit a photo on Instagram aren’t even half of it? Yup, you read right: there’s about 20 more. Just scroll on to the end and tap on Manage. You’ll then be led to the complete list of Filters available on the app, which to date, totals to 40.
(personal account)
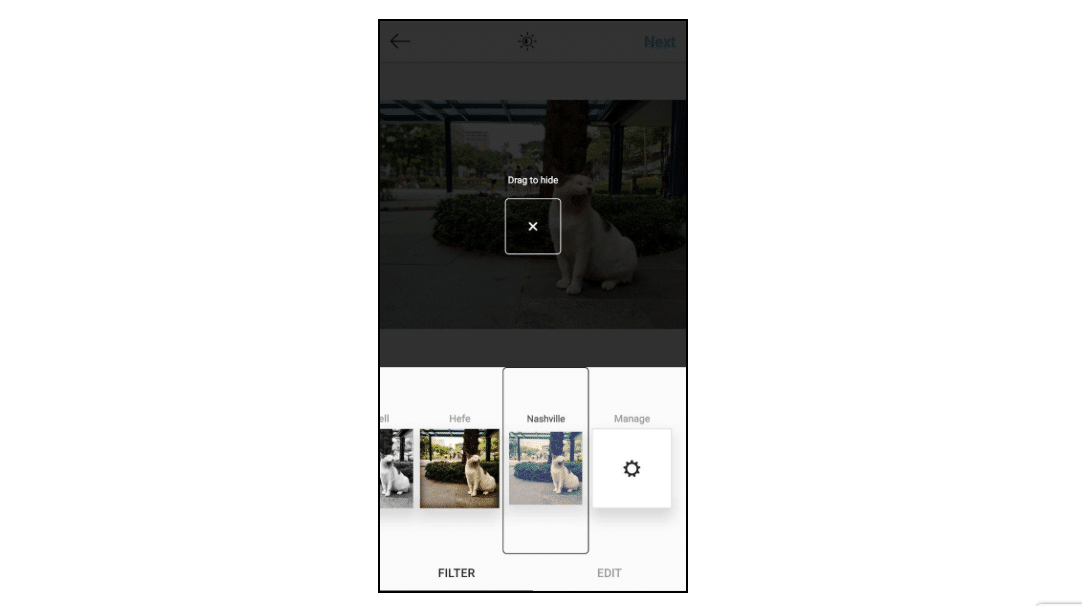
To quickly organize your Filters for accessibility, simply tap on the two horizontal lines (=) beside the Filter image and drag up or down. Meanwhile, tapping on the circle to the right of the Filter name allows you to choose which ones you want to be made available for use when you edit your images. Got filters you don’t use? Hide them by holding the filter and dragging it to the (X) box above.
(personal account)
If you find the many filters of Instagram a little too limiting for the look you want to achieve, you can try downloading editing apps or toolkits for social creatives from your app store.
Create an artsy Instagram Grid
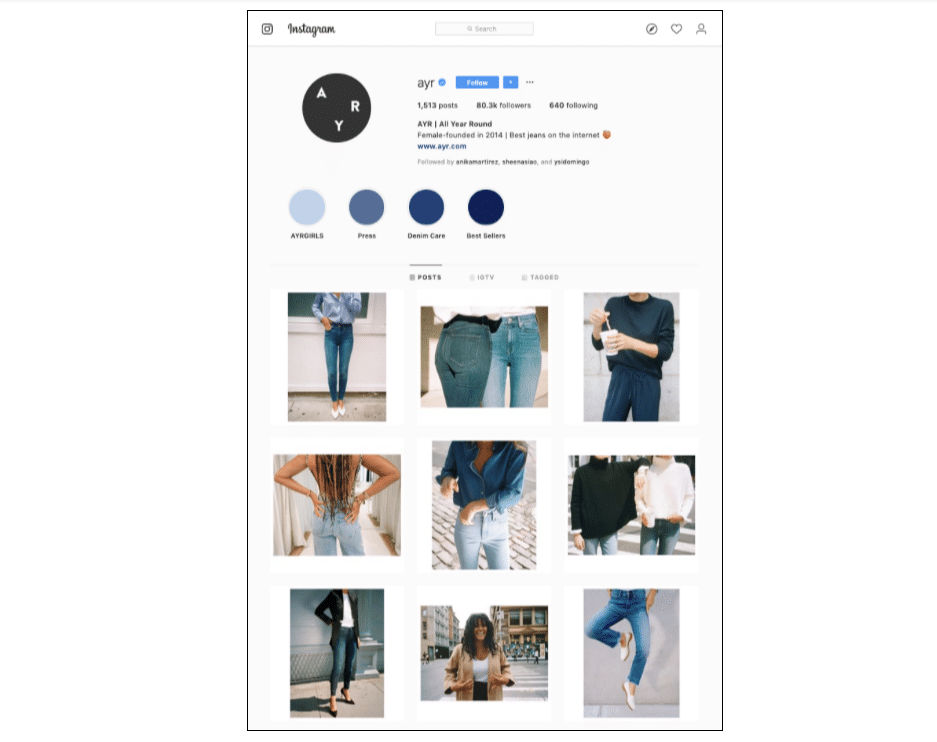
There’s more to creating amazing content on Instagram than just sharing beautiful images. Beyond paying attention to individual posts, you have to think about the overall look of your page, too.
https://www.instagram.com/ayr/?hl=en
One trick to achieving an eye-catching page is to explore the use of borders to the content you post. Borders allow you to share images of varying dimensions and create some breathing room between the content on your page.
It also allows you to unify the look of your posts—which is important if you tend to post a lot of different kinds of content that may not be aesthetically pleasing as a whole.
https://instasize.com/blog/new-border-pack-release-cider-borders
To add a border to your image, simply download a photo-editing app from your app store. Instasize, for example, has a lot of new border packs you can try out and play around with to jazz up the look and layout of your content.
Get Notified when specific people post
Don’t want to miss updates from certain people you follow? Want to keep tabs on influencers you’re partnered with? Turn on push notifications to see the posts that matter most to you.
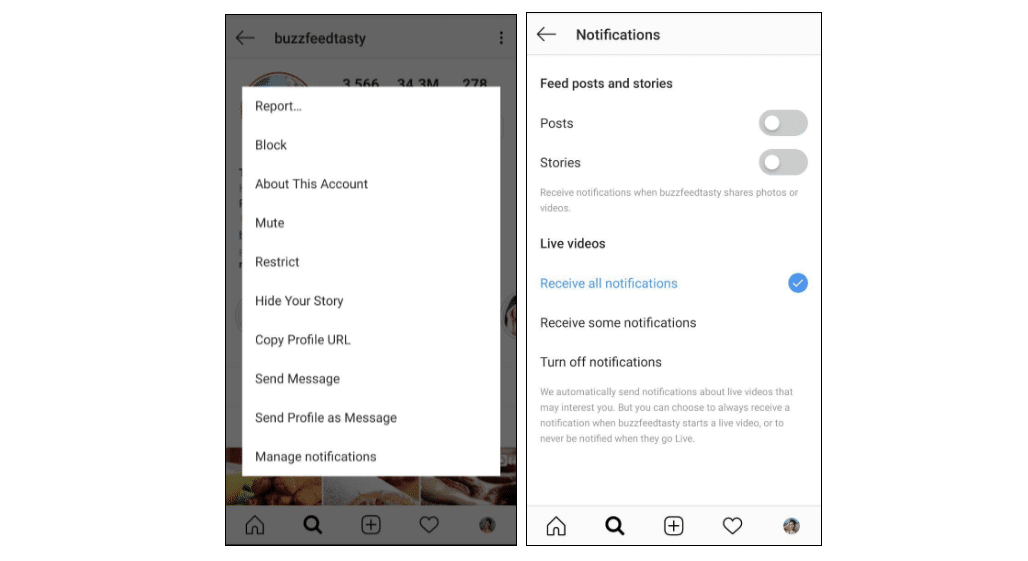
First of all, make sure you’re already following this person or account. Next, tap on the three dots (⠇) on the upper right corner of the page. Select “Manage Notifications” and choose the frequency with which you want to receive notifications.
Note that this trick also works when you don’t want to unfollow an account, but no longer want to be notified when they post or share something on Instagram. Great for when your partnership with said influencer expires.
(personal account)
Schedule your IG posts in advance
Any content or brand manager worth their salt knows that life is easier when you plan your posts in advance. In the previous years, this meant creating posts for the next couple of weeks for each social medium you have, then manually uploading them one by one as the dates arrived.
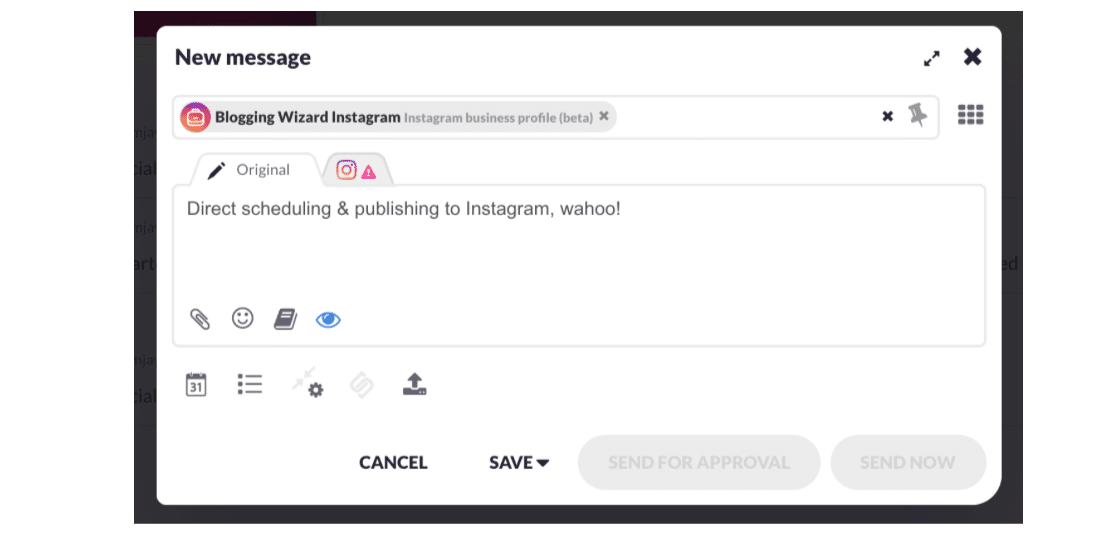
Today, Social Media Management tools like Sendible allow you to plan your content, schedule them, and automate posting across various platforms.
Not only does this streamline your work, it allows you more time to pay attention to other aspects of running your brand on Instagram.
Publish your IG posts at the right times for maximum engagement
When it comes to marketing on Instagram, the date and time youshare your content can spell the difference between a post that gets a lot of likes and one that doesn’t get seen at all.
Based on a study conducted by Sprout Social using data from its users, the best times to post on Instagram is Wednesday at 11am and Friday between 10am and 11am. Meanwhile, the worst time to post is somewhere between 11pm and 3am, with content shared on Sundays receiving the least amount of engagement.
Now it’s important to keep in mind that what works for one brand may be catastrophic for another. The best way to find out which dates or times help you achieve maximum engagement is to study your own followers. Look through your posts, see which ones have been performing best, and see how you can replicate those numbers or improve them even more.
Manually choose which of your Tagged Photos can be featured
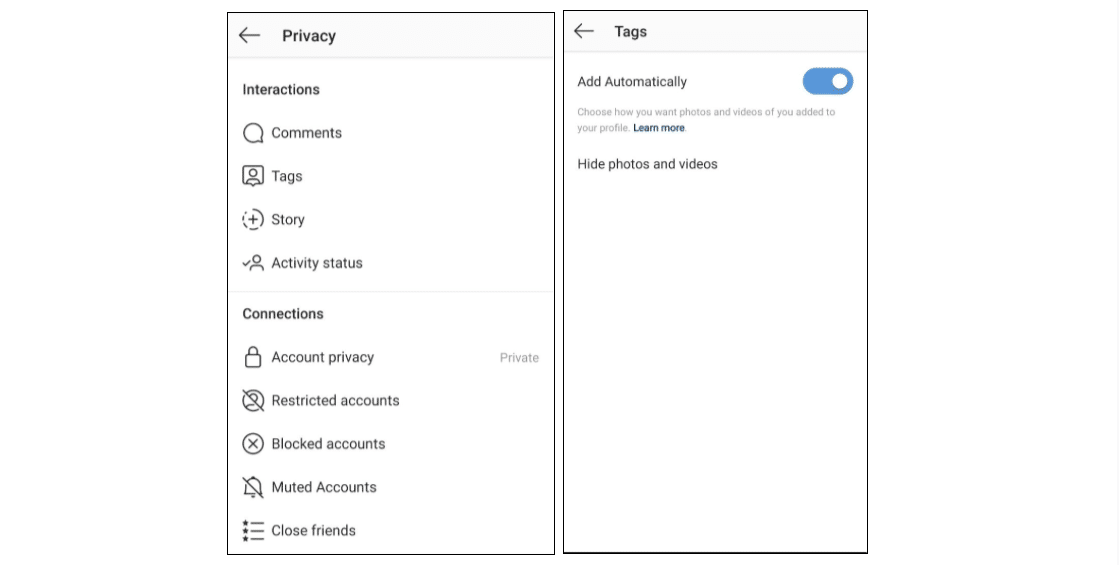
Do you find yourself constantly untagging yourself from photos of other people? If you want to free yourself from this burden, simply head on to your settings and switch off automatic tagging.
On your profile, tap the three horizontal lines (≡) on the upper right corner, then tap on Settings down below. Tap Privacy, then Tags, then toggle the button to disable Add Automatically.
(personal account)
By doing this, you can preview all your tagged photos and videos, and manually approve which ones will be featured on your profile.
Give your audience a sneak peek using Instagram Stories
With all the editing options, engagement tools, and interactive stickers, Instagram Stories really is a great way to have fun with your audience. But if you want to be memorable to your audience, you have to find ways to use the available features in a way that’s creative.
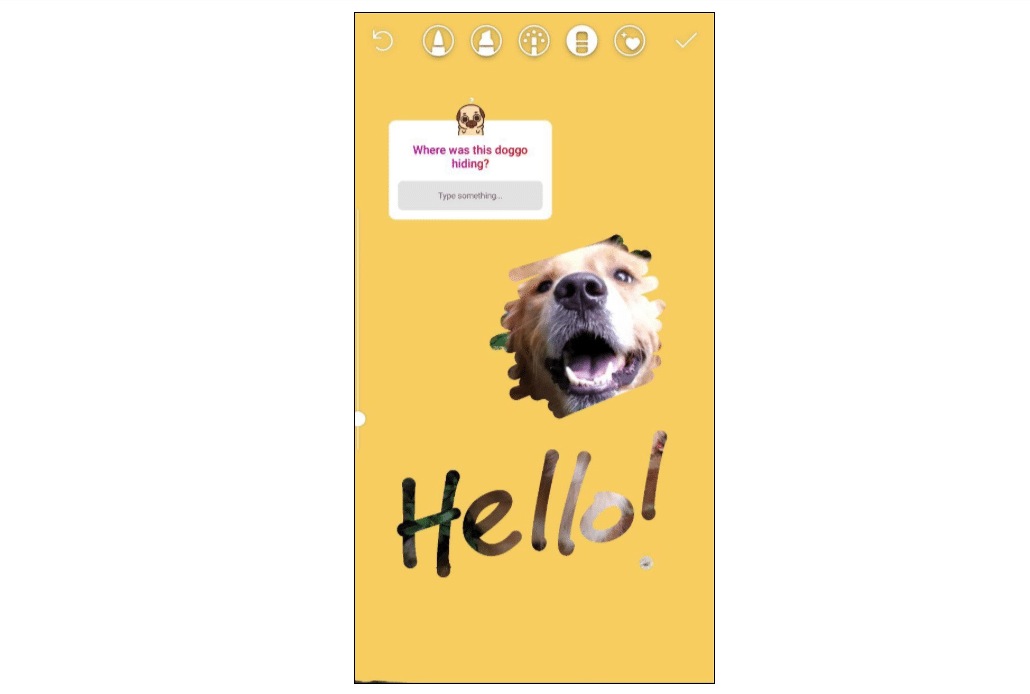
One trick you can try is using the pen tool to create interesting teasers. Simply paint over the image you want to tease your audience with, then use the eraser tool to reveal parts of the picture.
(personal account)
If you want to get people even more excited, you can add a sticker that allows them to guess what you’re revealing. While you’re at it, why not offer a prize to those who answer correctly?
Add a cover photo to your Story Highlights
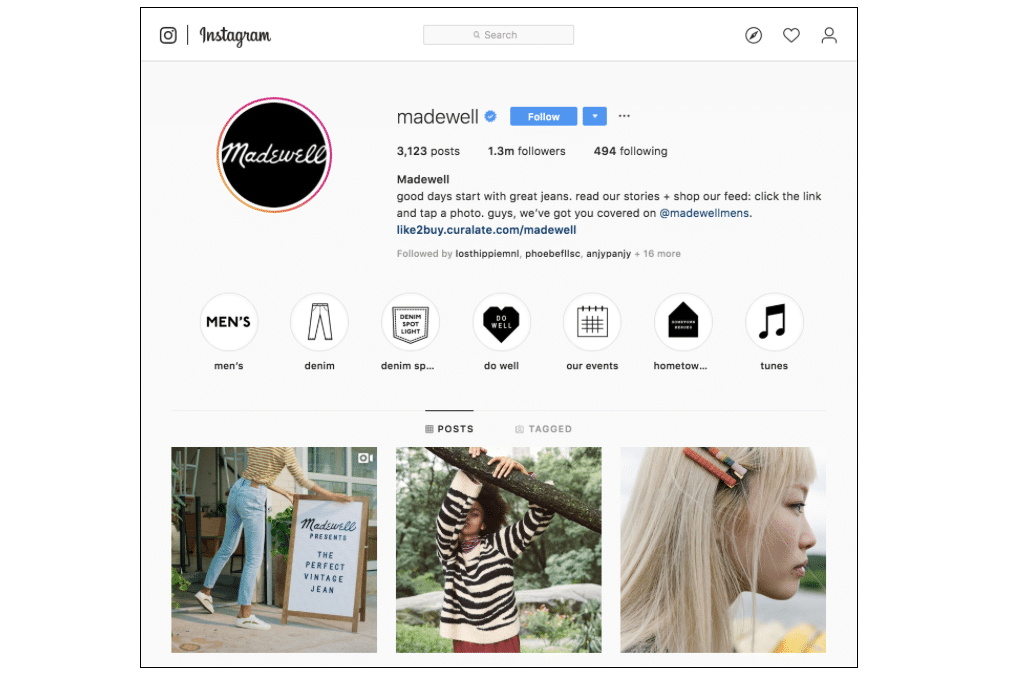
Unlike Instagram Stories, Story Highlights are forever—at least until you decide to delete them. They become part of your profile page, right between your bio and content.
Because of Highlights ultimately become part of your content, a great way to make sure the Highlight previews are cohesive with your page and your brand is to create cover photos for each of them.
https://www.instagram.com/madewell/?hl=en
To add a cover photo to one of your Highlights, simply tap on the preview and tap on More (⠇) on the lower right of your screen. Choose “Edit Highlight,” “Edit Cover,” then upload your cover of choice.
Create Stories using content from other users
Resharing your content from your followers is an easy but an amazing way to give them a shoutout. This is perfect for when you find influencers featuring your products on their Stories or content, or simply when you want to give recognition to some of your favorite followers.
And when it comes to resharing their content as part of your Stories, it literally is as easy as going to the post you want to share, tapping on the plane icon below it, and choosing “Add Post to Your Story.” You’re done in a minute with time to spare.
Hide your hashtags in your Stories
As we touched on in hack #3, hashtags are a godsend when it comes to getting your content to more audiences. You should know that the same holds true for Stories.
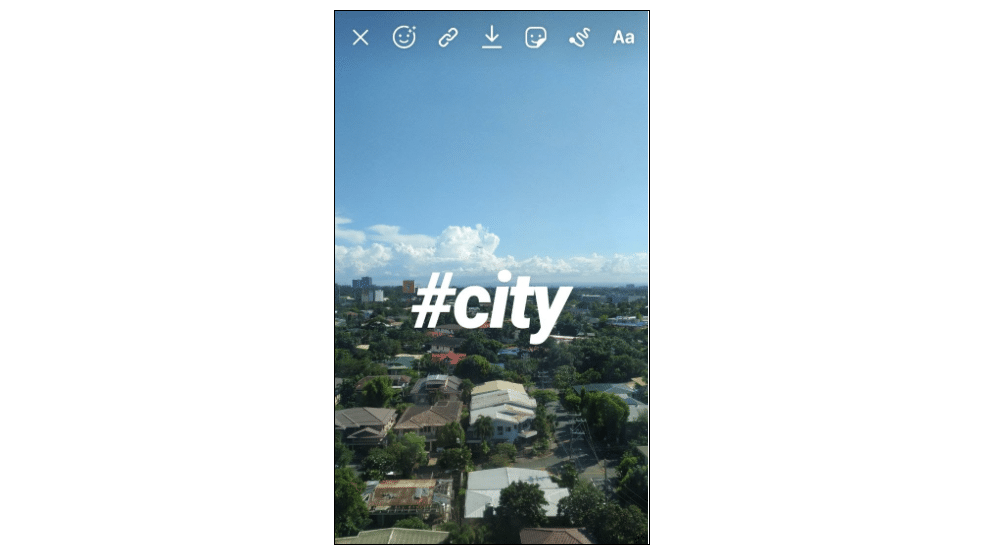
The thing is, unlike your run-of-the-mill posts, including hashtags on your Stories means having to place all that text on your image. Talk about ruining a good visual.
(personal account)
Luckily, hashtags can be easily hidden, especially if the Story you’re uploading is an image.
If your hashtags don’t have to be read, you can resize them to the smallest size possible, and place them somewhere below or above your Story, where your audience’s eyes won’t naturally be drawn to.
You can also change the color of your hashtags to match the color of its background. If the closest color isn’t available in the swatches, you can tap on the dropper icon to select a hue on the image itself.
(personal account)
Next, select an area whose color you want replicated (most likely within proximity of the hashtag in your image).
Et voila! Hashtags hidden, but very much still effective.
Control the comments on your posts
For businesses and marketers alike, we understand the necessity to control the conversations on certain posts.
Imagine promoting a movie, for example, and having one hyper-enthusiastic fan comment major spoilers. Or perhaps sharing content featuring an influencer with vocal haters trying to take away attention from your business by spamming your post with negativity. Situations don’t have to be as grave as those for them to become disasters waiting to happen.
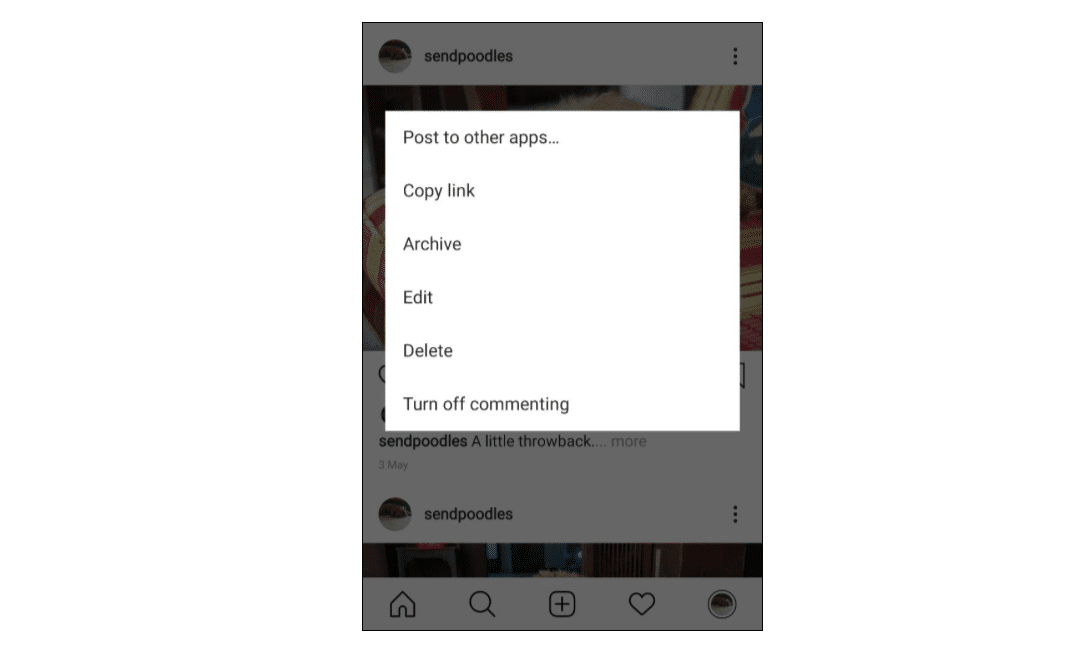
In such occasions, you can turn off commenting on your content. If there are specific posts you want to restrict, simply go to the post in question, tap on the three dots above the image (⠇) and choose “Turn Off Commenting.”
(personal account)
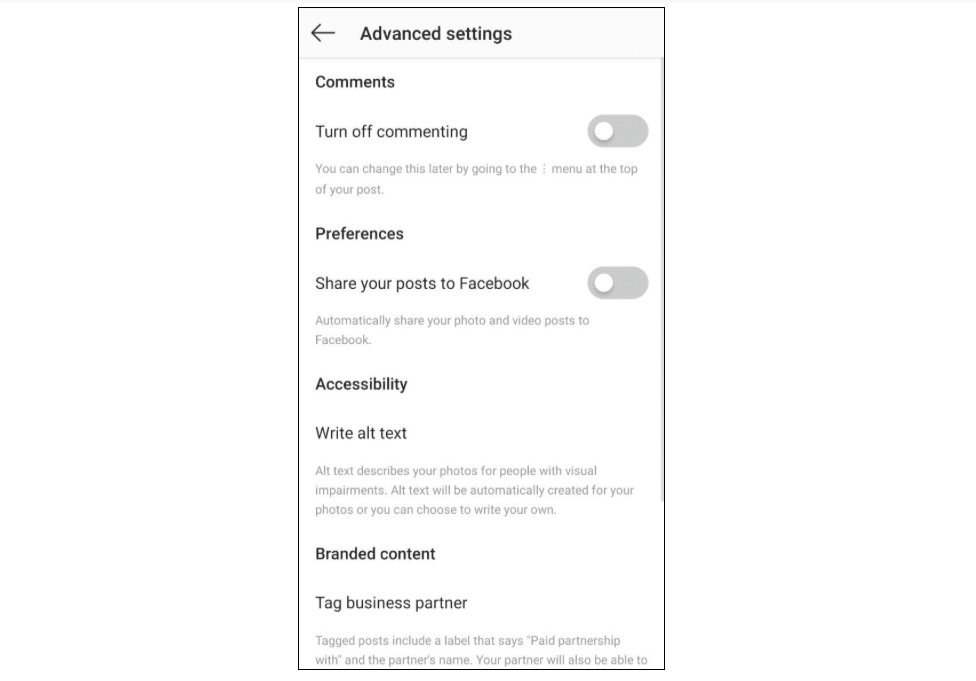
You can also do this right before uploading a post by tapping on “Advanced Settings” right before hitting share.
(personal account)
Should you need to control commenting on all of your posts, you can go to your Settings, tap on “Privacy,” then choose “Commenting.” Here, you’ll be able to block comments from specific people or filter out offensive comments and certain words. Crisis averted.
Turn your content into ads
Sometimes you have to spend some to get some — and when it comes to improving your reach on Instagram, this could mean turning your posts into ads.
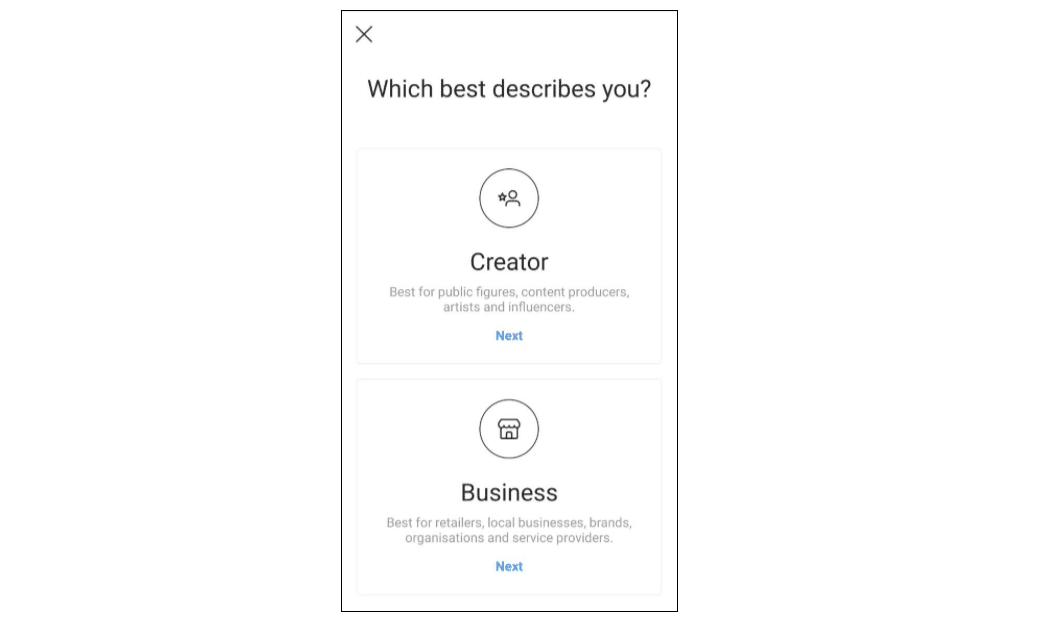
First of all, make sure that your profile is a business account. If it isn’t yet, check out your Settings, choose Account, tap on “Switch to Professional Account,” then choose “Business Account.”
(personal account)
Second, make sure you have a Facebook page linked to your Instagram account. If not, don’t worry because Instagram can create one for you.
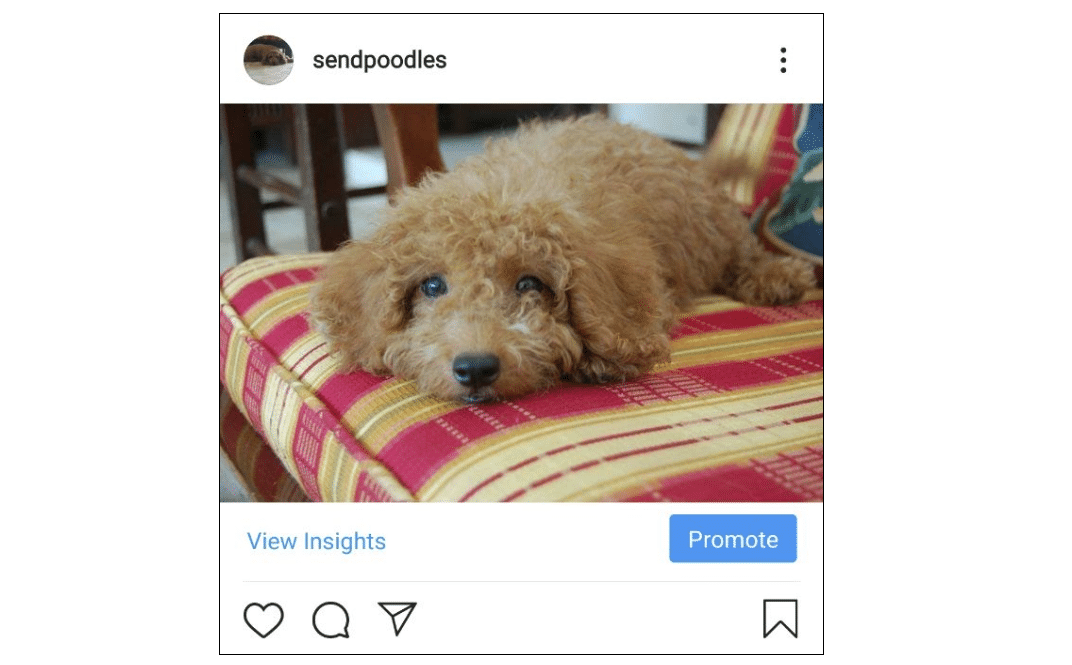
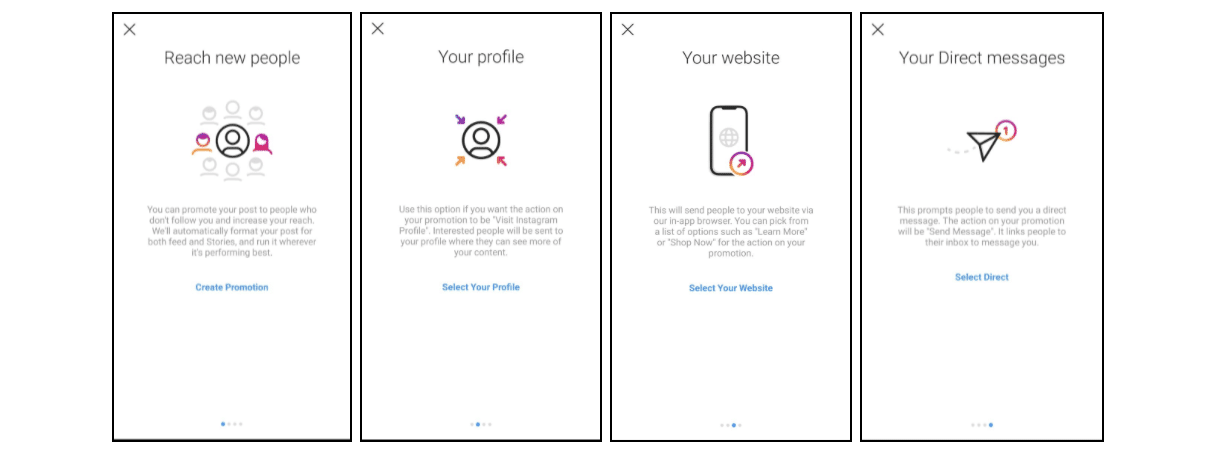
Next, the fun part: creating an add. Start by choosing which post you want turned into an ad and tapping on “Promote.”
(personal account)
Next, choose an objective. What goals do you have for your ad? What do you want people to do when they come across your post?
21 Instagram hacks we bet you haven’t tried (but should)
(personal account)
Once you select your objective, choose an audience you want to target. Do you want to reach profiles similar to your current following or do you want to hit a new audience altogether?
It’s important to know how much you’re willing to spend for this ad run, too. Set a daily budget and a duration for your ad.
Lastly, review your promotion and once you’re happy and satisfied, tap “Create Promotion” and wait while Instagram reviews your request. In the meantime, read through the rest of the hacks in this article.
Make your posts Shoppable
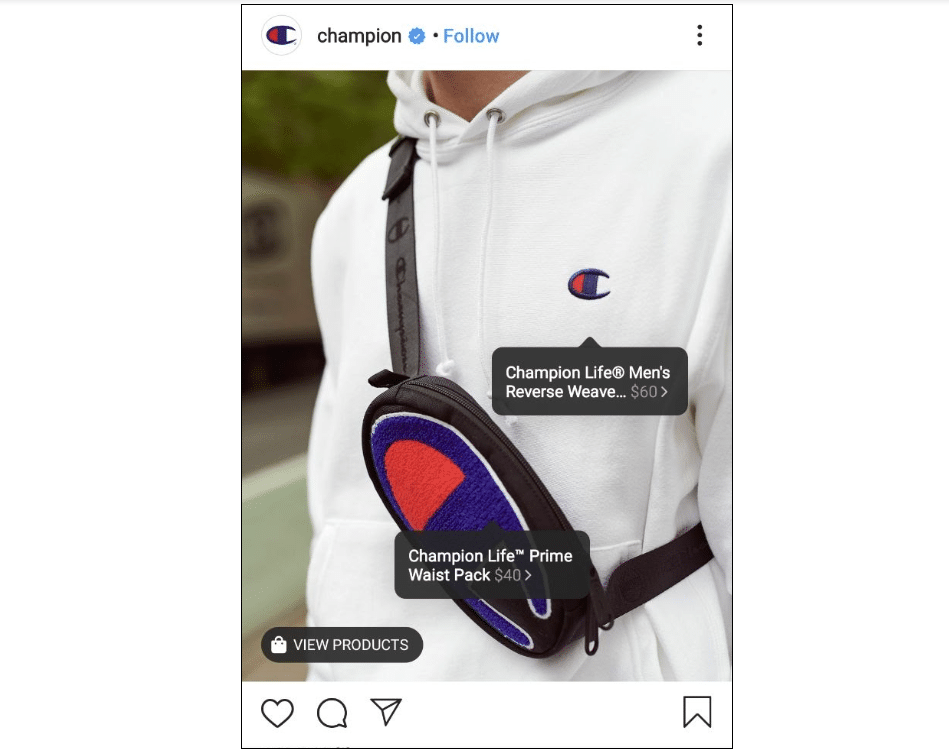
Assuming you’vealready made the switch to a Business Account, now would be the perfect time to inform you that aside from turning your content into ads, you can now also turn them into Shoppable Posts.
Shoppable Posts are perfect for business owners with products to sell. With one tap on the post, viewers can see the price of each product in the image, and tap again to purchase. Welcome to window shopping of the future.
https://www.instagram.com/p/B37hZjyJkzy/
To create Shoppable Posts, you have to be located in the United States, Canada, the United Kingdom, Brazil, Germany, Italy, France, Australia, or Spain. Your account must be approved for Instagram Shopping as well.
Assuming it is, head on over to your account’s Settings and tap on “Business.” Next, tap “Shopping,” then continue. Tap “Products,” and select the product catalog you want connected to your account. When you’re finished, simply tap “Done” and call it a day.
Aside from the obvious, what’s great about Shoppable Posts is that you can later turn these into ads, too. This means improved reach for your posts and better chances of making a sale for you.
Get verified on Instagram
You don’t have to be a celebrity with hundreds of fake accounts pretending to be you in order to benefit from being verified on Instagram.
Having a verified account also allows you certain benefits, like bypassing the minimum 10,000 follower count needed to link out on Instagram Stories. And of course, having that blue check next to your name legitimizes your account in the eyes of potential followers and would-be fans.
(personal account)
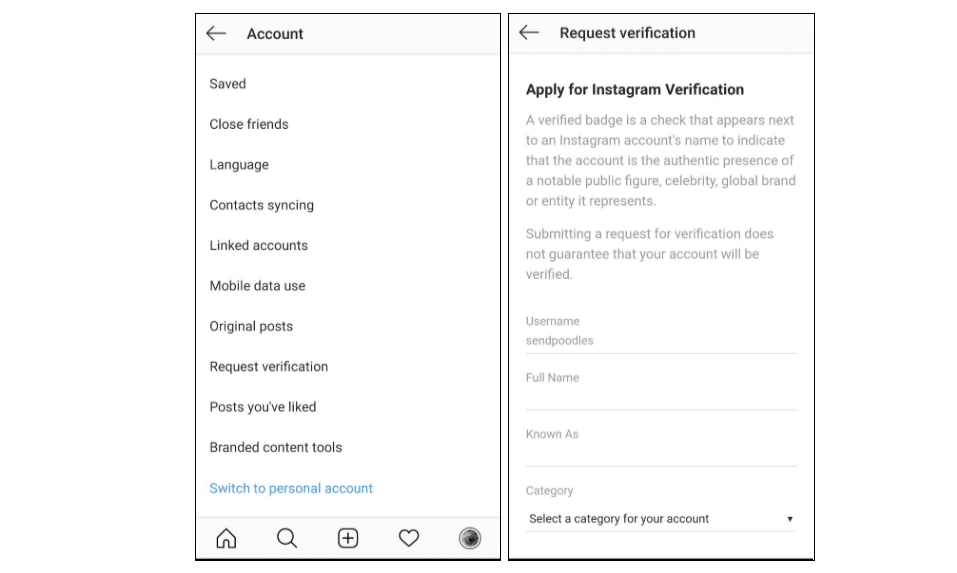
Luckily, becoming verified is as easy as requesting for it: all you have to do is head to your Settings, tap on “Account,” then request verification. You’ll have to provide necessary details to prove that you are who you claim to be, but that should be no problem—unless you’re a fake account, that is.
Having a strong, genuine online presence helps, too. Ditch the fake followers, personalize your content, and make sure you have your accounts on other social media platforms handy.
Maximize long-form video content (IGTV) for business
In the olden days, videos posted on Instagram needed to be 60 seconds or shorter; longer forms of content were for YouTube, Vimeo, or Facebook. Today, thanks to IGTV, things have changed.
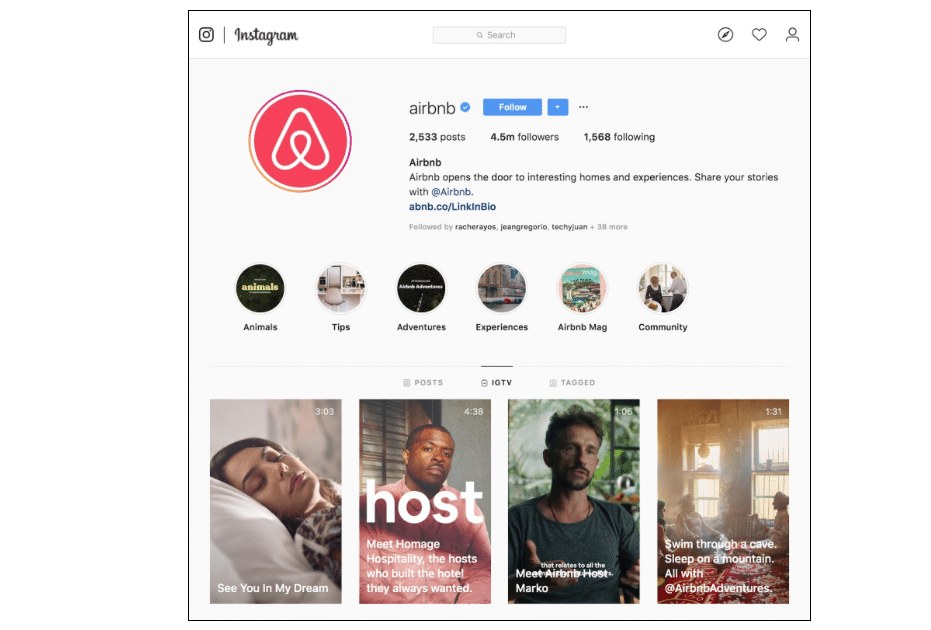
Think of IGTV as Instagram’s in-app YouTube: it allows users to have their own channel and post longform video content, without having to link viewers out to other sites or platform. This means that all of your content can now be housed on Instagram.
https://www.instagram.com/airbnb/channel/?hl=en
Of course, having all of your content housed in one platform has its perks. When you have new videos coming out on IGTV, you can easily use Stories to promote and link out to your channel. You can also share stills or screencaps and invite people to watch your video through your caption. Basically, you can use all of Instagram’s features to promote certain forms of content, thus maximizing the platform for your brand and tapping its user base to gain more views.
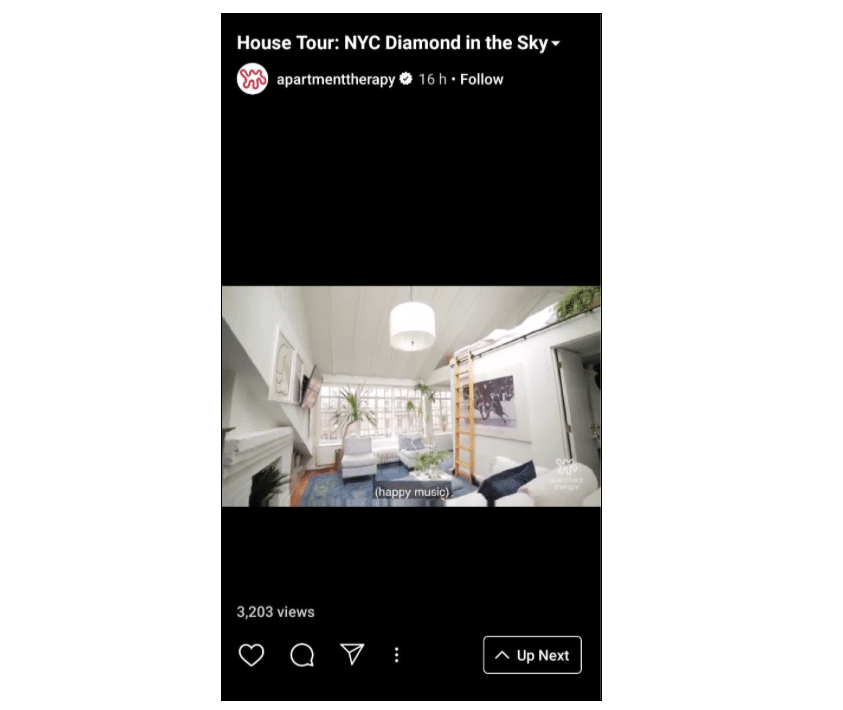
https://www.instagram.com/tv/B4GF0OgFmvc/?hl=en
And just in case you if you find the vertical format limiting, fret not; films uploaded on IGTV can now be enjoyed in its original horizontal orientation.
Save and organize posts where only you can see them
Need to save posts you come across while browsing through your feed or Explore page? No need to screencap; simply save the post instead.
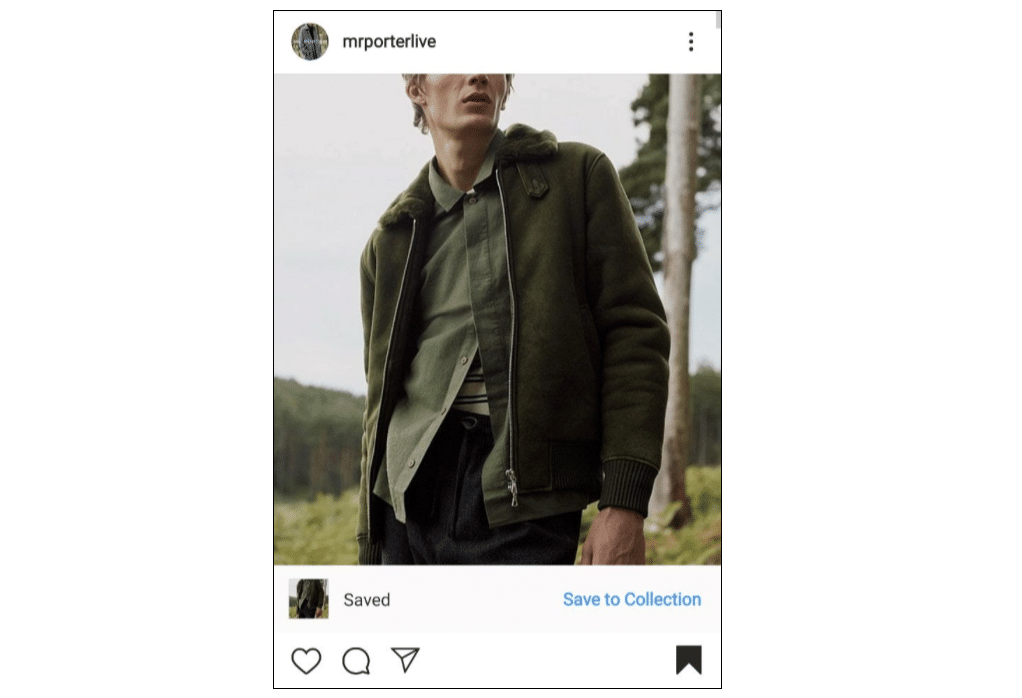
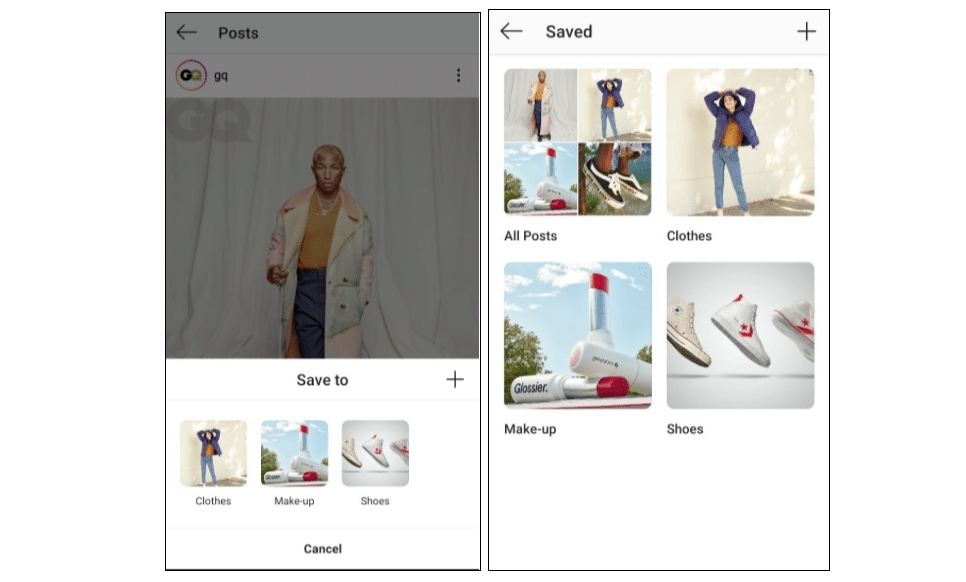
To save a post, all you need to do is tap on the banner icon on the lower right of the post. Then you’ll be shown the option to “Save to Collection” right after; tapping on this button will let you save the post to a new folder or an existing one.
https://www.instagram.com/p/B36cpkAlLm7/
If you want to organize all of your saved posts, simply tap on the three horizontal lines (≡) on the upper right corner of your profile page and choose Saved. To create a Collection, just tap on the cross, follow the subsequent steps, and select the saved posts you want to add.
(personal account)
This is perfect for bookmarking pegs, marking posts that feature your products, and keeping a close watch on your competitors’ efforts.
Simultaneously broadcast a live video
Partnering with certain influencers who are going Live on Instagram? Or are you hosting a live interactive event like a Q&A? Join other people’s Live feed or get them to join yours.
To join someone else’s video, simply request for it in the comments section. Once you get the confirmation, you’ll have a few seconds to prepare before the screen splits in two: one side showing the host of the video, the other showing you.
Getting other people to join your video is just as easy: while hosting your own Live video, simply accept the request in your comments section. If things get a little too rowdy, know that you can boot a guest from your video at any time.
The limit for simultaneous screening is two, so choose your guest wisely!
Create shortcuts for standard replies
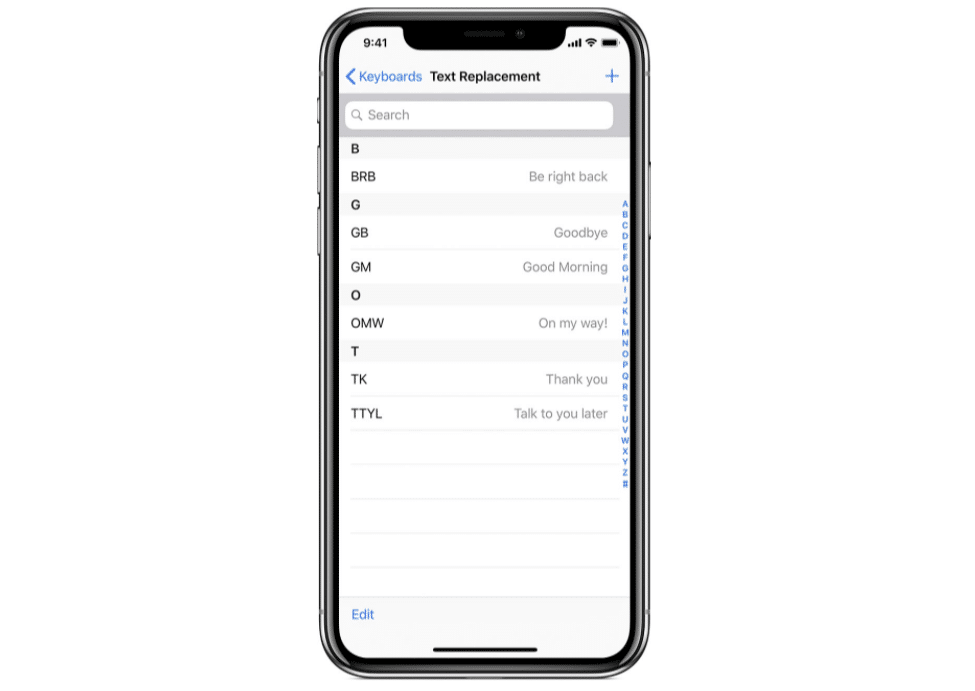
Do you always encounter the same questions from your followers? When certain comments can be answered with stock responses, have a standard reply ready so you can just copy and paste.
On an iOS phone, you can save it in your keyboard by heading to your Settings. Go to “General,” tap on “Keyboard,” then choose “Text Replacement.” Create a shortcut by tapping on the cross (+) symbol, typing out your entire response under “Phrase,” and assigning a word to it.
https://support.apple.com/en-eg/HT207525
For Android users, you can go to your phone’s own Keyboard settings or simply save your response in your phone’s notes app (or any note app of your choice, really). This not only saves you time when it comes to responding to the same thing over and over again—it helps you keep your sanity as well.
Conclusion
As we mentioned, Instagram is always changing. So much so, in fact, that it’s highly plausible that by the time you’ve finished reading this piece, some of the hacks written here would’ve already been obsolete, and other better ones would’ve taken their place. That’s the nature of the platform, and the digital landscape all together.
That said, beyond all the hacks mentioned in this piece, the most important thing to remember is to keep updating the app on your phone, and keep yourself updated on whatever’s new with the platform. Play around with Instagram, explore its tools, and figure out how you can use them for your brand. Most of the hacks written here were discovered that way, and we’re sure that’s how you’ll discover new ones on your own.

